The Drainage Plane Flashing Battle Continues

I don’t think I can ever say it enough, but the building enclosure consists of several control layers and each one has its job. The primary control layer is the one that keeps liquid water out, and it can be a tricky business. Take the case of this condo building (yes, it’s in the community where I live). It’s got several problems, so I went to bat for building science here.
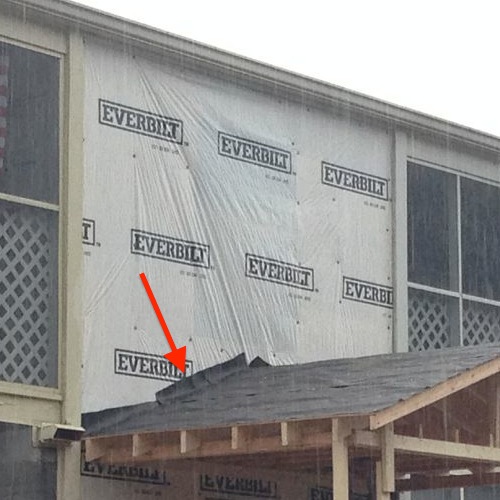
We’re having a couple of porticos built, and one day I noticed one of them in the stage of construction you see above. These buildings have no overhang, so that wall will get wet. The contractor put house wrap on the wall and then built the portico. The felt on the roof, as you can see, goes up the wall a bit, but on the outside of the house wrap. Problem?
Yes, that’s a problem. Any water coming down on the outside of the house wrap can go right down behind the felt and rot out the framing of that portico. Did I mention the building has no overhang?
I saw that I had still had a chance to help get it done right, so I talked with the president of the homeowners’ association and told him we need to make the contractor do it correctly. The house wrap needs to come down over the roof underlayment.
Also, since they hadn’t yet cut the house wrap for the window, I printed out the instructions on how to do that, too. Unfortunately, I wasn’t able to talk to the contractor directly at that point, so here’s what it looked like after a few days:

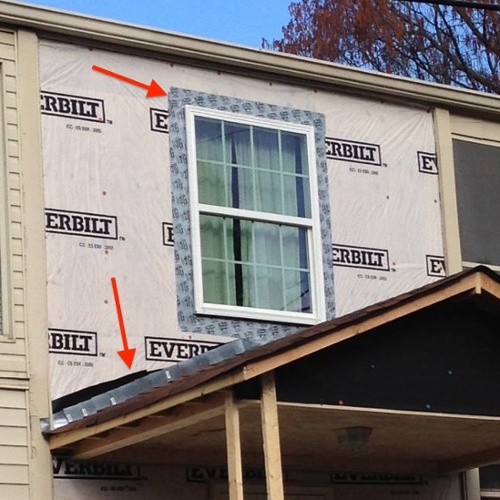
They did the standard window cut for the house wrap — a big X — then put the window on top of the house wrap and put flashing tape all the way around, on top of the house wrap. If no water ever gets behind the house wrap, this might be OK. On this building, with no overhang, it’s quite possible that water can get behind the house wrap. The tape on top of the house wrap wouldn’t help, and the window framing could rot.
They also didn’t fix the flashing detail at the roof. Notice they installed step flashing — but put it on top of the felt, which is still on top of the house wrap. Ugh!
Finally, we arranged a meeting with the contractor that I could attend, and we got things straightened out. Here’s what they corrected:
- We got them to replace the house wrap with a vapor permeable material, not just perforated plastic. (See Matt Risinger’s article and video about this. I’ll write more about it in a future article, too.)
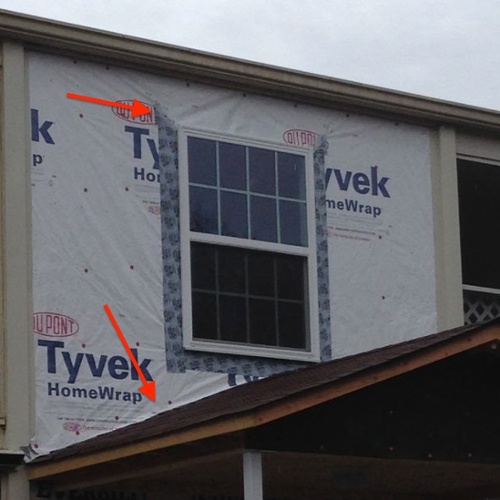
- The house wrap now comes down over the flashing at the roof intersection.
- The house wrap comes down over the top piece of window flashing tape.

It’s not perfect. They should have kept those nails at the roof intersection above the step flashing that runs beneath the house wrap. But it’s far, far better than we got initially.
Allison A. Bailes III, PhD is a speaker, writer, building science consultant, and the founder of Energy Vanguard in Decatur, Georgia. He has a doctorate in physics and writes the Energy Vanguard Blog. He is also writing a book on building science. You can follow him on Twitter at @EnergyVanguard.
Related Articles
2 Bad Ways to Install Windows the Hard Way
The Pen Test — A Control Layers Tool for Architects and Contractors
Air Barriers, Vapor Barriers, and Drainage Planes Do Different Jobs
NOTE: Comments are closed.
This Post Has 28 Comments
Comments are closed.

Thank you for the very clear
Thank you for the very clear pictures and explanations! For visual learners like me, seeing a picture goes a long way, I wonder if the same was true for the contractor. At least the porticos should last for more than a few years! <br /> <br />I see something in your text that I’m guilty of too, talking down to contractors. It’s a reminder to me to build them up, they always get torn down. Here is the line I noticed: "But it’s not so tricky that contractors can’t figure it out. " Perhaps, ‘We’ve found with a little education contractors embrace Building Science based methods.’ <br /> <br />And I’ll expect a correcting comment on my next article. =) Thanks for a good one, this was helpful to me and one I’ll point others to.
<b>Nate A.</b>:
<b>Nate A.</b>: Good point. I deleted that sentence.
I don’t mean for this comment
I don’t mean for this comment to sound promotional, but these types of details are the exact reason why we promote liquid applied membranes for the walls and liquid applied flashing components to tie everything together. The problem is not with the products, wraps and tapes work great when applied correctly, nor is it with the installers, most of the time they think they’re doing it right. The problem is with the ease of installation. If you look at the manufacturer’s install guide for the wrap and flashings at the window, there are probably between 6 and 10 steps in there that the installers have never even seen before. Unfortunately, they can get by with that most of the time. Water will eventually rot the framing as you point out in the first picture, but that could take a long time and by then most building owners will probably just chalk it up to standard wear and tear of a building. I love your blog because you’re taking the most critical step needed to improve on these types of flaws. You’re educating the masses so that we know to get it right the first time.
I assume they removed the
I assume they removed the errantly applied wrap first?
Great article as I see this
Great article as I see this sort of thing all of the time. In my experience, the largest portion of these types of errors are done by the least experienced workers on the jobsite. We expect framers to "dry-in" the building after completing the framing. The most experienced workers think this is beneath them so they assign it to the new guys who lack any understanding of why they doing it. Frequently, the lead guys are on to the next job. I wish we could afford to have a separate crew that only installed windows/doors,roof and wall wraps. Basically a dry-in crew that knew where to caulk and tape.
<b>John C.</b>: I
<b>John C.</b>: I like the liquid-applied membranes, too. Here’s an article I wrote about 6 drainage plane materials (although it should have been 7 – I forgot to include peel-and-stick): <br /> <br /><a href="6" rel="nofollow ugc">http://energyvanguard.com/blog-building-science-HERS-BPI/bid/73542/6-Materials-That-Drain-the-Rain-on-the-Plane-and-Keep-A-House-Dry"><i>6 Materials That Drain the Rain on the Plane and Keep A House Dry</i></a> <br /> <br /><b>skbehnke</b>: Funny you should ask that! At first, no, they didn’t. We did have them remove before they finished, though. <br /> <br /><b>Thomas D.</b>: Good points. <br /> <br />
Don’t forget about the
Don’t forget about the kickout flashing :) <br />http://thehtrc.com/2013/getting-details-right-roof-flashing
I agree on not talking down
I agree on not talking down to contractors. I’ve been guilty of that too. I didn’t realize it at the time, but recently I did just that at a Habitat for Humanity house while talking about the air barrier. I said something like "it’s not too difficult for your guys if they just pay attention to the details". He just stared at the plans. I kicked myself later. <br /> <br />You helped them get it right on this part of this one house, Do you think the contractor learned enough to do it right in other situations on future buildings, or at least to think about it? Or did they just fix this one because someone told them to?
Thank you for the very clear
Thank you for the very clear pictures and explanations! For visual learners like me, seeing a picture goes a long way, I wonder if the same was true for the contractor. At least the porticos should last for more than a few years!
I see something in your text that I’m guilty of too, talking down to contractors. It’s a reminder to me to build them up, they always get torn down. Here is the line I noticed: “But it’s not so tricky that contractors can’t figure it out. ” Perhaps, ‘We’ve found with a little education contractors embrace Building Science based methods.’
And I’ll expect a correcting comment on my next article. =) Thanks for a good one, this was helpful to me and one I’ll point others to.
Nate A.:
Nate A.: Good point. I deleted that sentence.
I don’t mean for this comment
I don’t mean for this comment to sound promotional, but these types of details are the exact reason why we promote liquid applied membranes for the walls and liquid applied flashing components to tie everything together. The problem is not with the products, wraps and tapes work great when applied correctly, nor is it with the installers, most of the time they think they’re doing it right. The problem is with the ease of installation. If you look at the manufacturer’s install guide for the wrap and flashings at the window, there are probably between 6 and 10 steps in there that the installers have never even seen before. Unfortunately, they can get by with that most of the time. Water will eventually rot the framing as you point out in the first picture, but that could take a long time and by then most building owners will probably just chalk it up to standard wear and tear of a building. I love your blog because you’re taking the most critical step needed to improve on these types of flaws. You’re educating the masses so that we know to get it right the first time.
I assume they removed the
I assume they removed the errantly applied wrap first?
Great article as I see this
Great article as I see this sort of thing all of the time. In my experience, the largest portion of these types of errors are done by the least experienced workers on the jobsite. We expect framers to “dry-in” the building after completing the framing. The most experienced workers think this is beneath them so they assign it to the new guys who lack any understanding of why they doing it. Frequently, the lead guys are on to the next job. I wish we could afford to have a separate crew that only installed windows/doors,roof and wall wraps. Basically a dry-in crew that knew where to caulk and tape.
John C.: I
John C.: I like the liquid-applied membranes, too. Here’s an article I wrote about 6 drainage plane materials (although it should have been 7 – I forgot to include peel-and-stick):
6 Materials That Drain the Rain on the Plane and Keep A House Dry
skbehnke: Funny you should ask that! At first, no, they didn’t. We did have them remove before they finished, though.
Thomas D.: Good points.
Don’t forget about the
Don’t forget about the kickout flashing 🙂
http://thehtrc.com/2013/getting-details-right-roof-flashing
I agree on not talking down
I agree on not talking down to contractors. I’ve been guilty of that too. I didn’t realize it at the time, but recently I did just that at a Habitat for Humanity house while talking about the air barrier. I said something like “it’s not too difficult for your guys if they just pay attention to the details”. He just stared at the plans. I kicked myself later.
You helped them get it right on this part of this one house, Do you think the contractor learned enough to do it right in other situations on future buildings, or at least to think about it? Or did they just fix this one because someone told them to?
Energy Vanguard turns
Energy Vanguard turns Building Avenger!
Energy Vanguard turns
Energy Vanguard turns Building Avenger!
Good post Allison. My
Good post Allison. My personal favorite is when they fold the house wrap on all 4 sides of the window, including the top.
Good post Allison. My
Good post Allison. My personal favorite is when they fold the house wrap on all 4 sides of the window, including the top.
"It’s got several
"It’s got several problems, so I went to bat for building science here." <br /> <br />And the contractor and the HOA and future occupants and product manufacturers and, well, you get the picture! <br /> <br />All the best.
“It’s got several
“It’s got several problems, so I went to bat for building science here.”
And the contractor and the HOA and future occupants and product manufacturers and, well, you get the picture!
All the best.
Maybe these guy’s need a
Maybe these guy’s need a crash course in interior shower building? In my opinion the exterior of a home should be constructed the same as an interior shower. I consistently see leaking shower pans and wall assemblies due to roofing nail penetrations on and around the curb and floor line. Most shower assemblies fail from the knees down where water either collects or wicks upward causing failures and leaks. The same could be said for around exterior windows, doors and foundations. I see roofing nail penetrations on the shower pan, curb and around drain assembly. Over time the membrane shrinks causing leaks around the nail penetrations. I could see this with exterior tapes over time as well. Maybe some of the problem is the confusion between what will seal around a nail and what won’t and the misunderstandings about how water travels. Many contractors do not realize water will travel up hill given the right opportunity.
The contractor’s failed to
The contractor’s failed to appreciate the gravity of the situation. Common problem.
The contractor’s failed to
The contractor’s failed to appreciate the gravity of the situation. Common problem.
Great post.
Great post.
Great post.
Great post.